Banana Bread Recipe
Banana bread universally reigns as a beloved comfort food, cherished for its delightful taste and the warmth it brings to our kitchens. It embodies the sweet reconciliation between not wanting to waste food and craving something utterly comforting and delicious. This baked delight turns the often overlooked overripe bananas sitting on our counters into a treasure, demonstrating that taste and sustainability can indeed go hand in hand. Not only does this approach support a more economical use of resources, but it also aligns with environmentally friendly practices by reducing waste.
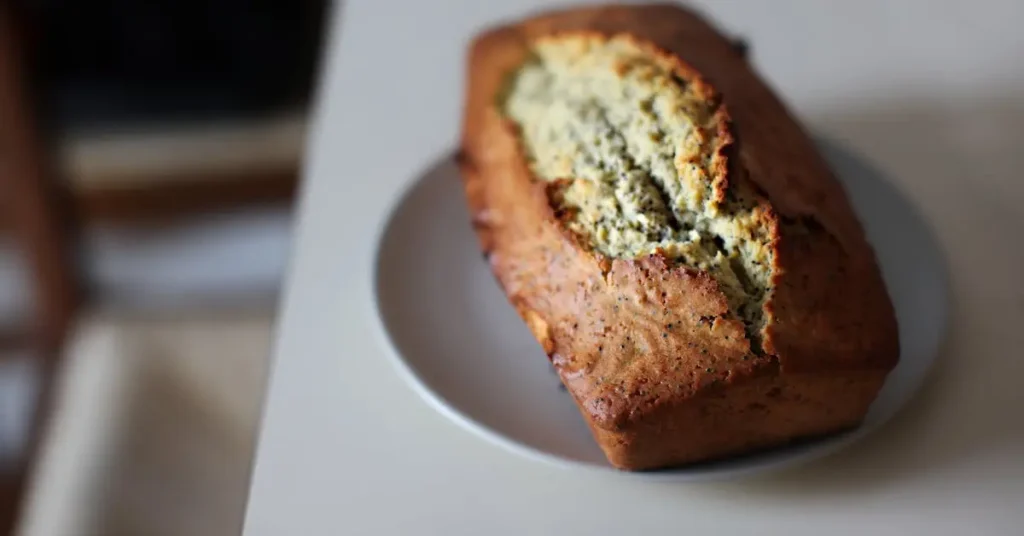
What sets this banana bread recipe apart is its remarkable ability to achieve the perfect balance of moistness and rich banana flavor, all while being astonishingly easy to prepare. Whether you’re a novice baker or a seasoned pro, this recipe promises to guide you effortlessly through each step, ensuring a delectable outcome every time. The secret lies in its carefully chosen ingredients and clear, straightforward instructions that guarantee a moist, flavorful loaf that’s just as good for a cozy breakfast as it is for an indulgent dessert.
Join me as we delve into the art of making the ultimate banana bread that stands out for its exceptional taste, irresistible texture, and simplicity in preparation.
Why This Banana Bread Recipe Works
This banana bread recipe shines as a testament to the culinary harmony achieved through the perfect balance of sweetness, moisture, and warmth. The success of this recipe hinges on the delicate equilibrium of these key factors. Firstly, the sweetness is carefully calibrated to enhance, not overshadow, the natural richness of the bananas. By doing so, the recipe preserves the integrity of the banana’s flavor, allowing it to be the star of the show.
Moisture is another critical element, and here, ripe bananas play a pivotal role. They not only impart their inherent sweetness but also lend an unmatched moistness that ensures every slice is tender and satisfying. This moisture is the backbone of the bread’s texture, making it both hearty and melt-in-your-mouth soft.
Adding to the recipe’s charm is the subtle warmth brought forth by cinnamon and nutmeg. These spices weave a layer of complexity into the bread, invoking a comforting sensation with each bite. Their presence is a gentle nod to the traditional flavors of home baking, yet they don’t overpower the banana’s starring role.
Beyond its foundational elements, this banana bread recipe celebrates versatility, inviting bakers to tailor it to their tastes or whims. Whether you’re a fan of the nutty crunch of walnuts or pecans, the sweet burst of chocolate chips, or the chewy texture of dried fruit, this recipe accommodates a variety of add-ins. This adaptability not only caters to diverse palates but also encourages creativity in the kitchen. You can stick to the classic version or transform it into a custom creation, making it a staple recipe that evolves with your culinary journey.
In essence, the success of this banana bread recipe lies in its foundational balance, moisture, and warmth, enhanced by the freedom to personalize. It’s a recipe that welcomes all bakers into a world of flavor, texture, and creativity, promising a delightful outcome in every loaf.
Ingredients Overview
Diving into the heart of this banana bread recipe, we uncover a carefully curated list of ingredients, each playing a pivotal role in crafting the perfect loaf. Here’s an overview of what you’ll need, along with thoughtful substitutions to accommodate various dietary needs and preferences.
Ingredients:
- Ripe Bananas: The cornerstone of any banana bread, ripe bananas provide natural sweetness and moisture. The darker and more spotted, the better. For those looking to add a different twist, try using mashed avocado for a portion of the bananas to reduce sugar and add healthy fats.
- Granulated Sugar: Adds sweetness that complements the bananas. For a healthier alternative, you can use coconut sugar or a reduced amount of pure maple syrup.
- Butter: Lends richness and contributes to the bread’s tender crumb. Vegan bakers can opt for vegan butter or coconut oil as a dairy-free alternative.
- Eggs: Act as a binding agent, giving the bread structure. For a vegan version, flax eggs (a mixture of ground flaxseed and water) or commercial egg replacers can be used.
- All-Purpose Flour: Provides the bread’s essential framework. Gluten-free bakers can substitute a gluten-free all-purpose flour blend to achieve a similar texture.
- Baking Soda: This leavening agent ensures the bread rises and becomes fluffy. There’s no direct substitute for its chemical reaction, but make sure it’s fresh for the best rise.
- Salt: Enhances the flavors of the other ingredients, making the sweetness and banana flavor more pronounced.
- Cinnamon and Nutmeg: These warm spices add depth and a hint of spice that elevates the banana flavor. They can be adjusted to taste or omitted based on personal preference.
- Walnuts (optional): Offer a delightful crunch and nuttiness. Those with nut allergies can omit these or substitute with seeds like pumpkin or sunflower for texture.
- Chocolate Chips (optional): Introduce pockets of melty chocolate, making the bread feel more indulgent. Use dairy-free chocolate chips for a vegan-friendly addition.
- Dried Fruit (optional): Raisins, dried cranberries, or chopped dates can add sweetness and a chewy texture for a different twist on the classic recipe.
Each ingredient in this banana bread recipe is selected not just for its flavor but for its role in achieving the perfect balance between moistness and structure. By understanding the function of each component, bakers can feel empowered to make substitutions that align with their dietary needs without compromising on the delicious outcome of this beloved treat. Whether sticking to the traditional ingredients or experimenting with alternatives, this banana bread is sure to satisfy any palate.
Step-by-Step Recipe Instructions
Embark on the delightful journey of baking the perfect banana bread with these step-by-step instructions. From preparing your ingredients to the moment you savor that first slice, follow this guide for a loaf that boasts an irresistibly moist texture and rich banana flavor. Let’s dive in!
1. Prep Your Ingredients and Pan
- Start with Preheating: Set your oven to 350°F (175°C) to ensure it reaches the right temperature by the time you’re ready to bake.
- Mash the Bananas: Peel and mash your ripe bananas until smooth. A few lumps are okay, but you want a consistent texture to distribute the banana flavor evenly.
- Prepare the Pan: Grease a 9×5-inch loaf pan with butter or line it with parchment paper. This prevents the bread from sticking and allows for easy removal.
2. Mix the Wet Ingredients
- Cream Butter and Sugar: In a large bowl, vigorously mix the softened butter and sugar until light and fluffy. This process incorporates air into the batter, contributing to a lighter texture.
- Incorporate Eggs and Vanilla: Add the eggs one at a time, mixing well after each addition. Stir in the vanilla extract and mashed bananas until the mixture is well combined.
3. Combine Dry Ingredients
- In a separate bowl, whisk together the all-purpose flour, baking soda, salt, cinnamon, and nutmeg. This ensures the leavening and spices are evenly distributed throughout the flour.
4. Merge Wet and Dry Ingredients
- Gradually add the dry ingredients to the wet mixture, folding gently with a spatula. Over-mixing can lead to a dense loaf, so mix just until no flour pockets remain.
5. Add Extras
- Fold in any optional ingredients like walnuts, chocolate chips, or dried fruit. This step is your chance to customize the bread to your liking.
6. Bake
- Pour the batter into your prepared loaf pan and smooth the top with a spatula. Bake in the preheated oven for about 50-60 minutes. To prevent over-browning, you can tent the bread with aluminum foil halfway through baking.
- Fold in any optional ingredients like walnuts, chocolate chips, or dried fruit. This step is your chance to customize the bread to your liking.
7. Check for Doneness
- Test the Bread: Insert a toothpick or skewer into the center of the loaf. The bread is done when it comes out clean or with a few moist crumbs clinging to it.
- Look for Signs: The bread should have a golden-brown crust, and the edges should start to pull away from the pan.
8. Cool and Enjoy
- Let the bread cool in the pan for about 10 minutes, then transfer it to a wire rack to cool completely. This patience ensures the bread sets properly and doesn’t fall apart when sliced.
Tips for Perfection:
- Banana Ripeness: The riper the bananas, the better. Overripe bananas contribute to both the moisture and sweetness of the bread.
- Measuring Flour: Spoon the flour into your measuring cup and level it off with a knife. Too much flour can make the bread dry.
- Oven Variability: Know your oven. If it runs hot or cold, adjust the temperature or baking time accordingly.
By following these steps, you’ll craft a banana bread that’s not just a treat for the taste buds but a testament to the joy of baking. Whether for a special occasion or a cozy weekend at home, this banana bread is sure to become a cherished recipe in your collection.
Customization Ideas
Elevate the classic banana bread experience with a dash of creativity and personal flair. Transform this beloved bake into a canvas for your culinary imagination with these enticing customization ideas. Whether you’re craving something decadently chocolatey, delightfully nutty, or sweetly spiced, there’s a variation to satisfy every preference.
Chocolate Lover’s Dream
- Go Chocolate: Stir in 1/2 cup of cocoa powder to your dry ingredients for a rich chocolate banana bread. For an even more intense chocolate experience, fold in a cup of chocolate chips or chunks before baking.
Streusel-Topped Delight
- Crunchy Streusel Topping: Mix together 1/2 cup of all-purpose flour, 1/4 cup of brown sugar, 1 teaspoon of cinnamon, and 3 tablespoons of cold butter, cubed. Sprinkle this mixture over your batter before baking for a sweet and crunchy topping that adds a delightful texture contrast to the moist bread.
Swirls of Peanut Butter
- Peanut Butter Swirl: Dollop 1/2 cup of peanut butter over the top of your batter and use a knife to swirl it into the mixture. This adds a creamy, nutty flavor that beautifully complements the banana base.
Adjusting Sweetness and Spices
- Sweetness to Taste: If you prefer your banana bread less sweet, reduce the sugar by up to a quarter. Conversely, for a sweeter loaf, consider adding a little extra sugar or a drizzle of honey or maple syrup into the batter.
- Spice it Up: Don’t shy away from experimenting with spices. While cinnamon and nutmeg are classic, cardamom or pumpkin spice blend can offer a unique twist. Start with a teaspoon and adjust according to your taste preferences.
Nutty and Fruity Variations
- Nuts and Seeds: Walnuts and pecans are traditional, but why not try sliced almonds, pumpkin seeds, or sunflower seeds for a different crunch?
- Dried Fruit: Mix in dried cranberries, cherries, or apricots for a tart contrast to the sweet banana flavor. Soaking the dried fruit in warm water for 10 minutes before adding it to the batter can enhance its juiciness.
Savory Takes
- Savory Flavors: For a less traditional approach, incorporate finely chopped sun-dried tomatoes, olives, or even cooked bacon into your batter for a savory banana bread. Pair these ingredients with complementary herbs like rosemary or thyme to add depth.
Gluten-Free and Vegan Options
- Allergy-Friendly: Substitute the all-purpose flour with your favorite gluten-free blend and the butter with coconut oil or a vegan butter alternative. Swap eggs for flax eggs (1 tablespoon ground flaxseed mixed with 3 tablespoons water per egg) to cater to dietary restrictions without sacrificing taste or texture.
By embracing these customization ideas, you not only keep your banana bread exciting but also tailor it to fit any occasion, mood, or dietary preference. Whether sticking closely to the classic or venturing into uncharted flavor territories, the beauty of banana bread lies in its versatility and the joy it brings with each personalized slice.
Tips for Perfect Banana Bread Every Time
Crafting the perfect banana bread is an art that combines the simplicity of ingredients with the nuances of baking techniques. To ensure your banana bread is a masterpiece every time, follow these expert tips from selecting the right bananas to troubleshooting common baking issues.
Selecting and Ripening Bananas
- Choose Overripe Bananas: For the best flavor and moisture, use bananas that are overripe—dark, spotty, and soft. The more ripe the banana, the richer the taste of your bread.
- Quick Ripening Technique: If your bananas are still green or yellow, accelerate their ripening by placing them in a brown paper bag with an apple or tomato overnight. The ethylene gas released by the apple or tomato will naturally ripen the bananas.
Choosing the Right Pan
- Opt for Light-Colored Metal Pans: Light-colored metal loaf pans are ideal for banana bread as they conduct heat evenly, reducing the risk of the sides and bottom cooking too quickly compared to the middle. Dark or glass pans can cause the exterior to cook faster, potentially leading to a burnt crust before the inside is done.
- Size Matters: A standard 9×5-inch loaf pan is perfect for most banana bread recipes. Ensure your pan is the right size to prevent over or under-baking.
Troubleshooting Common Issues
- Sinking Middle: If your banana bread consistently sinks in the middle, it might be due to overmixing the batter or opening the oven door too early. Mix just until the ingredients are combined, and avoid checking on the bread until it’s nearly done.
- Dry Banana Bread: A few culprits can lead to dryness, such as measuring flour incorrectly or baking too long. Spoon and level your flour instead of scooping it, and start checking for doneness 5-10 minutes before the recipe suggests. Remember, if a toothpick inserted into the center comes out clean, it’s done.
- Uneven Baking: To promote even baking, rotate your loaf pan halfway through the baking time. This accounts for any hot spots in your oven and ensures a uniformly baked loaf.
- Cracked Top: A crack down the middle of your banana bread is normal and often desired, indicating a well-risen loaf. However, if the crack is deep and the bread is dry, reduce your oven temperature slightly next time to allow a slower rise.
Additional Tips
- Moisture Is Key: Don’t skimp on bananas to ensure your bread stays moist. If you’re a bit short, a tablespoon or two of yogurt or applesauce can make up the difference.
- Let It Cool: Allow your banana bread to cool in the pan for about 10 minutes before transferring it to a wire rack to cool completely. Cutting into it too soon can cause it to crumble.
By adhering to these tips, you’ll enhance your banana bread baking skills, ensuring a deliciously moist and flavorful loaf every time. Whether you’re a seasoned baker or new to the kitchen, these insights will help you avoid common pitfalls and elevate your banana bread to perfection.
Storing and Freezing Instructions
Ensuring your banana bread retains its delectable moistness and freshness requires proper storage techniques. Whether you’re looking to savor it over the next few days or save it for a future treat, follow these expert guidelines on storing and freezing your banana bread.
Storing Banana Bread at Room Temperature
- Cool Completely: Before storing, let your banana bread cool completely to avoid condensation inside the container, which can make the bread soggy.
- Wrap Tightly: Once cooled, wrap your banana bread tightly in plastic wrap or aluminum foil. This helps to keep air out and maintain its moisture.
- Use an Airtight Container: For added freshness, place the wrapped bread in an airtight container.
- Shelf Life: Properly stored, banana bread will last at room temperature for about 3 to 4 days. After that, it’s best to refrigerate or freeze it to maintain its quality.
Refrigerating Banana Bread
- Wrap and Container: Follow the same wrapping and container instructions as for room temperature storage.
- Refrigeration Duration: In the refrigerator, banana bread will stay fresh for about 1 week. Remember, the cooler temperature slows down mold growth and preserves the bread’s flavor and moisture.
Freezing Banana Bread
Freezing banana bread is an excellent way to extend its shelf life while preserving its taste and texture.
Freezing a Whole Loaf
- Cool Completely: Ensure the bread is completely cool to prevent ice crystals from forming.
- Wrap Securely: Double wrap the loaf in plastic wrap or aluminum foil, then place it in a freezer-safe bag or wrap it again in aluminum foil.
- Label: Mark the bag or foil with the date to keep track of how long it’s been in the freezer.
- Freeze: Stored this way, banana bread can last in the freezer for up to 3 to 4 months.
Freezing Individual Slices
- Slice: After the bread has cooled, slice it into your preferred serving sizes.
- Separate Layers: Place parchment paper between slices to prevent them from sticking together when frozen.
- Wrap and Bag: Wrap the stack of slices in plastic wrap or aluminum foil, then place them in a freezer-safe bag.
- Thawing: Thaw slices at room temperature when you’re ready to enjoy. Alternatively, individual slices can be microwaved for a quick thaw.
Thawing Frozen Banana Bread
To thaw a whole loaf, transfer it from the freezer to the refrigerator and let it thaw overnight. If you’re in a hurry, you can thaw it at room temperature for a few hours. For a just-baked taste, warm the bread in a 350°F (175°C) oven for 10-15 minutes or until heated through.
By following these storage and freezing instructions, you can enjoy your banana bread at its best, whether it’s freshly baked or preserved for future indulgence.
Conclusion
In conclusion, just as crafting the perfect banana bread involves selecting the right ingredients, mastering the art of mixing, and personalizing with unique add-ins, navigating the real estate market requires a blend of knowledge, strategy, and personalization. This banana bread recipe serves as a metaphor for the real estate journey—both begin with foundational elements (ripe bananas or a market analysis) and are enhanced by personal touches (chocolate chips or a dream home’s desired features).
In real estate, as in baking, success comes from understanding the basics, adapting to the environment, and adding your personal flair. Whether you’re a first-time homebuyer, a seasoned investor, or someone looking to sell, it’s about combining the right ingredients: location, budget, and market trends, with your personal needs and aspirations. Just as baking banana bread can be a comforting and rewarding experience, finding the right property or making a successful sale can be equally fulfilling.
Now, as you venture into the real estate market, think of it as preparing to bake. Gather your ingredients (market knowledge, financial readiness, and personal requirements), follow the recipe (your real estate plan), and don’t hesitate to customize (find the property that fits your unique taste and needs).
We invite you to share your real estate experiences and insights just as you would your banana bread variations. Did you find a strategy that worked particularly well for you? Adjust your approach to fit market conditions? Your stories enrich the collective knowledge of the real estate community, fostering a space where everyone can learn, grow, and succeed.
So, whether you’re preheating your oven to bake banana bread or preparing to make your next move in the real estate market, remember that the key to success lies in blending the essential elements with your personal touch. Happy baking and happy house hunting!
So preheat your oven, grab those ripe bananas, and embark on your banana bread baking adventure. We can’t wait to hear about your successes, learn from your experiments, and celebrate the joy of baking together. Happy baking!